Migration from Exchange 2013 already began by many of the organization who is using Exchange Server. However, still, there are a number of users who are looking for Exchange 2013 to 2019 migration which will be guided here. We will bring some of the best Exchange migration solutions to make work easier.
Microsoft Exchange 2013 has already crossed its end for support deadline, but if you are one of them that is still using the older version should migrate as soon as possible. The end for support means that the user will enable to get any technical support, resolution for any bug, and much more.
However, some ways can take you with Exchange 2013 to 2019 migration. This technical guide discussed solutions to help migrate toward Exchange 2019.
How user can migrate mailboxes from Exchange 2013 to the 2019 version?
Before a user can look for the Exchange 2013 to 2019 migration, there are certain prerequisites that you need to fulfill, as you need them to be able to migrate your data. So, let’s start explaining them one by one:
- There is a requirement to install the latest cumulative update, which was released in the month of July 2021.
- Make sure to have Microsoft Outlook 2013 or its above version, as Exchange 2019 does not support older Outlook editions.
- If you still host on the Windows R 2 Domain controller, you should decommission it as the new Exchange version, i.e., 2019, does not support it.
- Also, a different set of hardware and software requirements for Exchange 2019 needs to be followed.
These are some of the requirements that you need to fulfill in order to start the migration.
Also, do remember first to install the Exchange 2019 server.
Once done, kindly follow the steps below to start migrating the mailboxes.
A step-by-step way to migrate from Exchange 2013 to 2019
After installing the Exchange Server 2019, you can now be able to do the migration from Exchange 2013. To see how you can do it, please follow the listed procedure:
Step 1
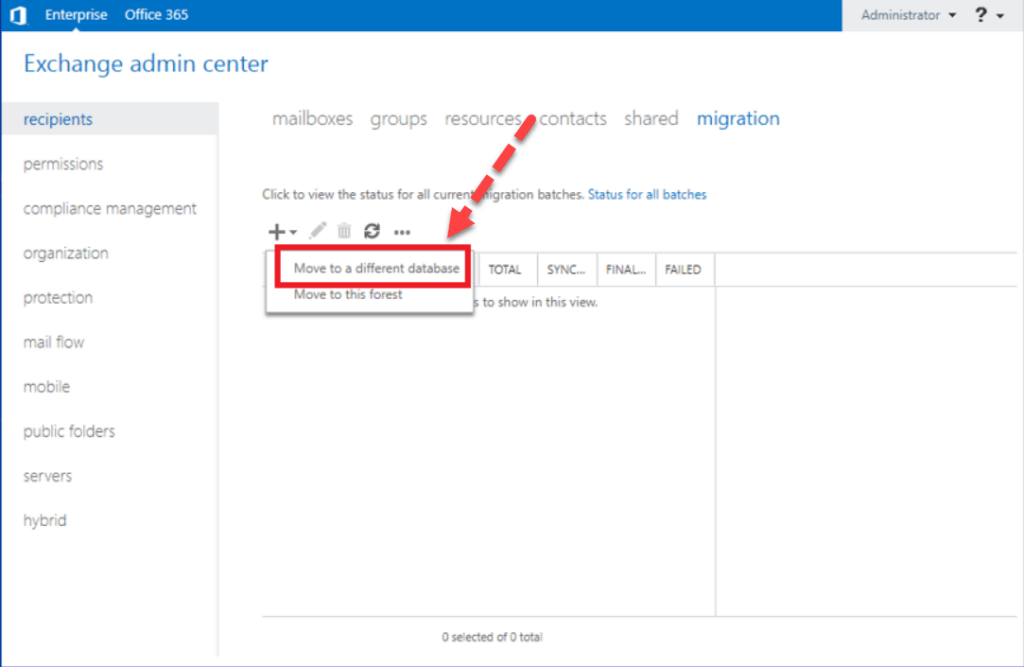
Log in to the Exchange Admin with the credentials. Click on recipient>migration and select move to a different database option.
Step 2
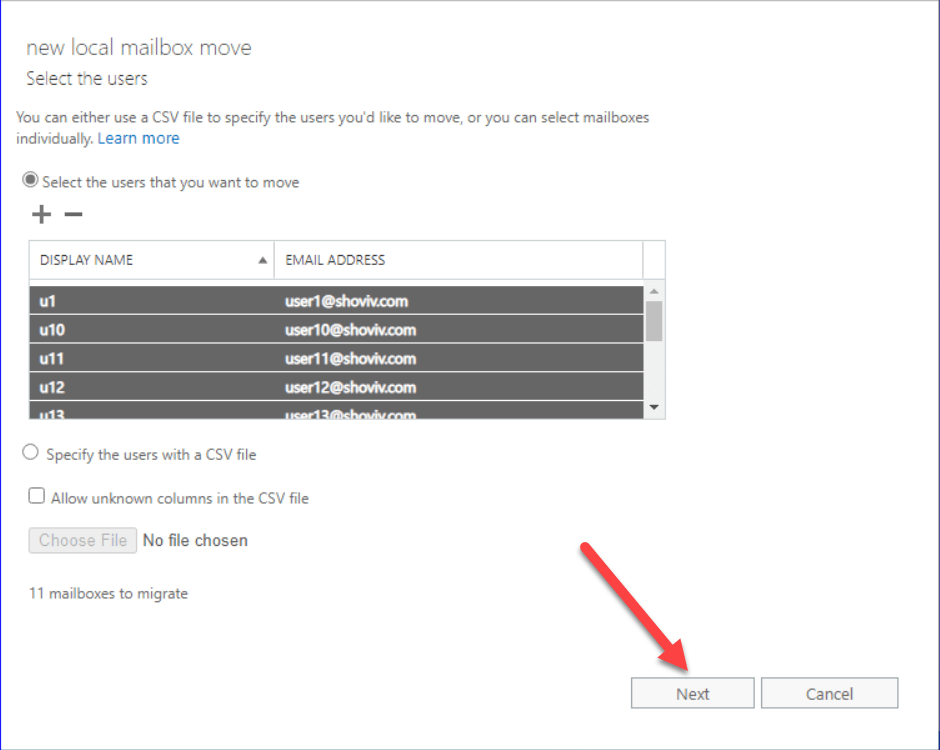
In the Select the user’s window, you will require to choose the user who is looking to migrate. You can simply add or remove using the sign as shown in the image. Or it is possible to upload multiple users through the CSV file, which you can do by clicking on specify the users with a CSV file option. Click on Next to move ahead.
Step 3
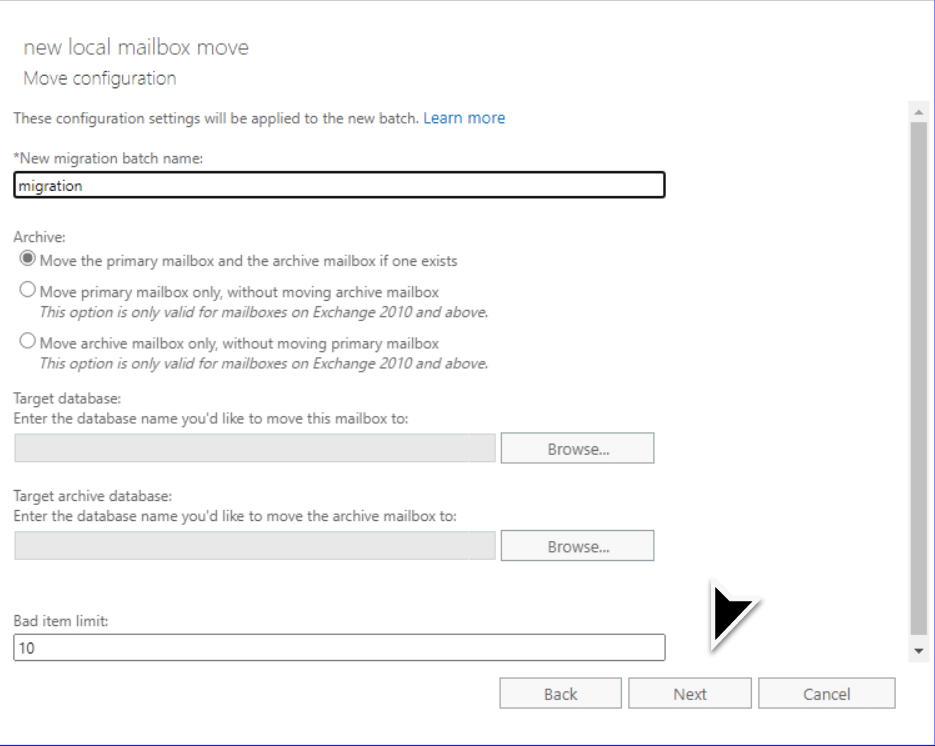
The configuration setting page will now appear. Here, you need to mention the name of the migration batch. Select the first option, which is to move the primary user mailbox and archive, if any. Using the browse button, choose the location to store the mailbox and archive data. In the bad item limit, enter the maximum count of the failed item.
Step 4
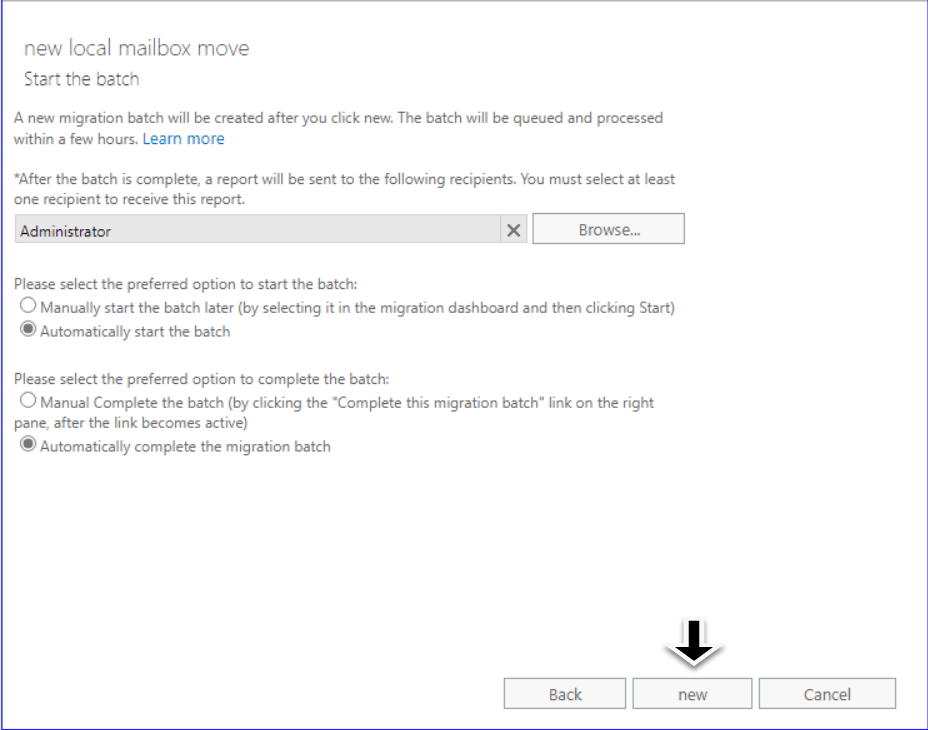
Now start the migration batch; make sure to mention the user to which you need to share the migration status report with the help of the browse button. Select the preferred option for starting the migration batch. Choose from manually or automatically. Once done with these parts then, click on New.
Step 5
Now you can see the migration status in the migration section within the recipient.
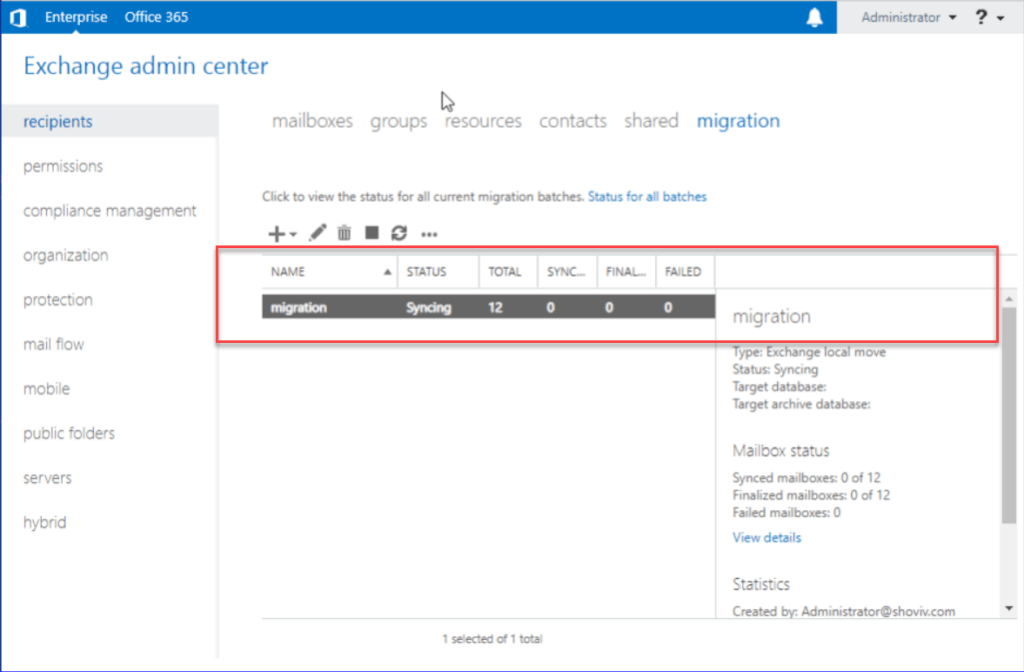
Once you can complete the first batch for migration, you need to wait for a shorter time to start the next batch for Exchange 2013 to 2019 migration, as there will be a delay in synchronizing the Active directories with the account.
So, this is all about our first method for the Exchange migration. However, this method requires patience as the time for migration will depend upon the data in user mailboxes. Moreover, the process is a little bit tricky for users who don’t know about the technicalities involved in migration.
Also, there are several shortcomings of this method. Any mistake while doing the migration will greatly affect migration results. So we are leaping to a more professional solution, which is proficient in moving Exchange data quickly.
Migration of Exchange 2013 Mailboxes into Exchange 2019 using third-party software
So far, we have understood the Exchange 2013 to 2019 migration via manual solution through the usage of EAC. However, not many users will find them comfortable to use, so the need for the alternative solution rises. Shoviv Exchange Migration Tool is the picture-perfect solution that helps users easily move their required mailboxes from one Exchange edition to another.
Users can easily connect with the Exchange due to its better GUI and can migrate their multiple mailboxes at a single time. Also, users can review the loaded mailboxes in the software. Users can also customize the migration because of the availability of the data filter option.
One of the powerful and advanced options that this Exchange 2013 to 2019 migration tool provides is the incremental export option. After using this option, if in case the migration needs to be stopped and then when the user resumes the migration, then it will only process the left item. In addition to this, a mailbox mapping option is also available. Due to this, users can move data from one mailbox to another.
Users can try the trial edition of this software if they want to ensure how this tool performs when they start their migration. In this version, the software allows processing the first/50 items per folder.
Check how this software migrate mailboxes from Exchange 2013 to 2019
- Open the software, and from its ribbon bar, click on Add button.
- After that, a new window will open, which will allow you to connect with Exchange. Kindly click on Add Exchange server mailboxes. Subsequently, you must also provide the domain IP, user name, and password. Click on next to continue.
- Now you will be able to see the list of all mailboxes. Select only the required and click on the Live Exchange option.
- In the Export item to Live Exchange mailbox wizard, select the folder & sub-folder you wish to migrate.
- Next, you need to enter the credential of the Target Exchange in order to connect with the software. Enter details such as the name of Exchange, user emails, and the password. Also, from Export in the drop-down, select the required mailbox where you want to migrate the whole data.
- Now the item filter option comes, which you can apply as per your requirement. After doing this straightway, click on the Next button.
- After that, the tool will start migrating the mailboxes and will also display the live log where the user can see the current status of the migration.
Conclusion
Exchange migration seems to be a challenging task, no matter how many technical skills one has. There are multiple things to keep in mind before starting the Exchange 2013 to 2019 migration and to tackle it in a better way, we have prepared this blog. We have shared the manual solution as well as the third-party migration tool to ease up the task of most users. However, we recommend users first try the demo version of the software, which will provide them with better insights into their capabilities.
Once you get hands-on with the software functionality, you can decide whether to move to another solution.